Nadiya’s Fast Flavours episode 3: Nadiya pulls out all the stops as she turns her attention to sweet sensations for you to treat yourself. First up is a magical custard tart with a creme brulee twist. Nadiya starts by making a shortcrust pastry laced with crushed hazelnuts for texture and salted pretzels for wow factor. Next, she makes a silky custard filling, which is oven baked, sprinkled with sugar and blowtorched, creating the signature creme brulee finish.
Next, Nadiya shifts her focus to bread, rustling up a fabulously fancy focaccia. She loves to bend the rules, so instead of sticking with a savoury flavour, she is going sweet. Her recipe takes its inspiration from the winning coffee and walnut combination often found in a cake. The springy light dough is laced with nuts, while the top is infused with an aromatic coffee and olive oil glaze, and finally decorated with a glorious coffee icing.
Biscuits are next on the agenda, and it’s classic shortbread that is next in line for a makeover. Nadiya makes a foolproof biscuit dough but injects maximum flavour using lemon zest and fresh basil. Basil is light and fragrant, and Nadiya reminds us that it’s not just for pizza! Her light, buttery shortbread rounds are filled with a sublime filling of rich white chocolate and zesty raspberry jam, before being sandwiched together to create the ultimate bitesized treat.
Finally, Nadiya takes on one of the most classic flavour combinations of all time: chocolate and mint. But this isn’t about mint choc chip; Nadiya instead uses shop-bought mini rolls, blitzed up and squished together, to create an instant layer of cake. She then makes a minty cream filling and tops the entire dessert with fresh mint leaves, dipped in melted dark chocolate.
Also, Bolton-based pastry chef Dinesh Patel makes his signature Shrikhand cheesecake, which combines elements of a classic cheesecake with flavours found in a traditional Indian sweet treat.
Nadiya’s Fast Flavours episode 3 recieps:
Lemon basil shortbread
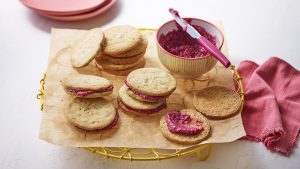
These buttery lemon shortbread biscuits are just joyous. Flavoured with fresh basil and filled with jam and white chocolate, they are great for afternoon tea or homemade gifts.
Method:
- Beat the butter and sugar until light and fluffy. Add the chopped basil, lemon zest and vanilla and mix to incorporate well. Add the flour and mix until a dough forms. Don’t be tempted to knead the dough, simply bring it together.
- Flatten the dough into a round, wrap in cling film and leave to chill in the fridge for at least half an hour. Line four baking trays with baking paper.
- Take out the dough, dust the work surface with a little flour and roll the dough out into a sheet about 3mm/⅛in thick. Using a 6cm/2½in round cutter, cut out rounds and place on the trays with a 1cm/½in gap between them. Keep cutting, bringing together the excess and re-rolling until you have used up all the dough.
- Prick the surface of each biscuit twice using a fork and pop the trays into the fridge for 30 minutes. Preheat the oven to 180C/160C Fan/Gas 4.
- Take the tray out of the fridge and generously sprinkle each biscuit with sugar. Bake for 10–12 minutes, until lightly golden. Take out and leave to cool completely on the tray.
- Mix the jam and the white chocolate together. Dollop some jam on the underside of a biscuit and top with another biscuit. Repeat with the remaining biscuits.
Choco-mint roll

This cheaty chocolate mint roll is one of my favourite no-bake cakes. You can use either leftover or shop-bought cake, which will be broken into crumbs and simply pressed into shape. Covered in chocolate-coated mint leaves and filled with a mint cream, it’s a fresh take on the chocolate roulade in more ways than one!
Method:
- If you are making the decorations, start by lining a baking tray with some baking paper and laying the mint leaves on it, with their undersides facing upwards. Heat the chocolate until it just starts to melt and mix until it is runny. Brush the underside of the leaves with chocolate and leave to set, chocolate-side down. Chill in the fridge until completely set.
- Now line a 23cm/9in square cake tin with baking paper and set aside. Take the mini rolls out of the packets and add to a food processor. Pulse until the mixture begins to form a dough. Transfer to the lined tin and use the back of a spoon to flatten into a neat, flat, tight layer. Place in the fridge while you make the ganache and filling.
- Make the ganache by heating the chocolate and cream in a saucepan over a low heat. Leave to melt, stirring occasionally. As soon as the chocolate has melted, mix in the mint extract and mix well to form a smooth, glossy ganache. Set aside to cool at room temperature.
- To make the mint cream, put the cream in a bowl. Put the sugar and mint leaves in a mortar and use the pestle to grind to a minty green, wet sugar. Start whipping the cream and as soon as it starts to thicken, add the minty sugar and mix through. Take the cake out of the tin and layer the cream evenly on top.
- Roll the cake, starting with the edge closest to you and using the paper underneath to help. As soon as you get to the end, place seam-side down and pop into the fridge to firm up for half an hour. If the roll cracks, just pinch to bring together. As bakes go it’s forgiving, so go for it.
- As soon as it’s out of the fridge, take a dollop of the ganache and spread a thin layer over the roll, then stick your minty leaves on top to decorate (if using).
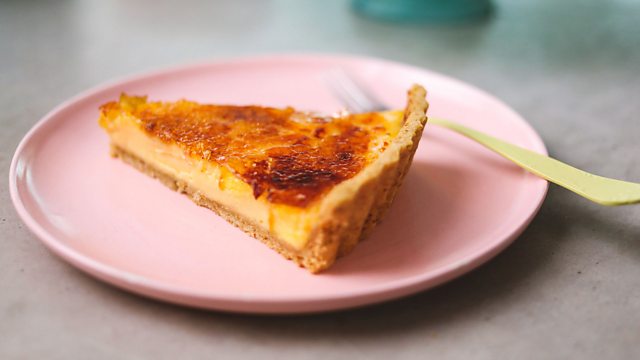
Pretzel nut brûlée

This is my version of a custard tart, but it’s what’s underneath and on top that really makes it special. The pastry is made with hazelnuts and salted pretzels that give it a crunchy nuttiness; and once baked, the custard is covered with sugar and blow-torched to create a crisp, sugary brûlée topping. Magical!
Method:
- Start by making the pastry. Blitz the nuts and pretzels in a food processor to a fine crumb. Add the flour and process until combined. Add the butter and process briefly until the mixture forms clumps. Add 2 tablespoons cold water and process briefly until the pastry just comes together. If it is too dry, add an extra teaspoon of water. (Take care not to overwork the pastry as it will make it tough.)
- Remove the pastry, and work it briefly using your hands to bring it together. Wrap in cling film and leave to chill in the fridge for half an hour.
- Take the pastry out of the fridge and roll it out between sheets of cling film (so you can get it as thin as possible) until large enough to cover the base and sides of a 25cm/10in fluted loose-bottom tart tin, with some overhang. Lift off the top piece of cling film and use the base cling film to gently flip the pastry on top of the tin. Peel away the cling fllm and push the pastry into the base and fluted edges of the tin. Trim off all the excess, then poke holes into the base using a fork and pop into the freezer for 30 minutes.
- Preheat the oven to 180C/160C Fan/Gas 4 and pop a baking tray onto the middle shelf.
- Take the lined tin out of the freezer, add a scrunched-up piece of baking paper into the tart shell and fill with baking beans or dry lentils. Pop onto the preheated baking tray and bake for 20 minutes.
Method part 2 :
- After 20 minutes, take out the tart shell, including the tray, and remove the paper and beans. Return it to the oven to bake for 10 minutes without the paper, then brush it with a little leftover egg white and cook for another 2 minutes.
- Take the tart shell out and leave to cool on a wire rack. Reduce the oven temperature to 150C/130C Fan/Gas 2.
- Now onto the filling. Pour the cream into a saucepan and bring just to the boil, then take off the heat. Add the sugar and egg yolks to a medium bowl and whisk well until combined. Gently pour the hot cream into the egg mixture in a steady stream, whisking all the time.
- Pour the filling into the baked tart shell through a sieve (to catch any eggy lumps that might have formed). This will result in a super-smooth baked custard. Pop any bubbles on the surface using a toothpick.
- Pop back into the oven and bake for 35–40 minutes. When you take it out there will be a slight wobble in the centre.
- Leave to cool completely in the tin and then refrigerate for at least 4 hours. Once you are ready to serve, sprinkle the remaining sugar evenly across the top, avoiding the pastry edges. Using a blowtorch, heat the sugar until golden all over and leave to set for a few minutes. It is now ready to remove from the tin, slice and serve.