Best Home Cook episode 2 – This week, on “Best Home Cook,” Mary Berry throws down the gauntlet, challenging the contestants to whip up their quintessential meringue desserts, in celebration of a family festivity. The kitchen buzzes with activity as breathtaking pavlovas, innovative fruit curd pies, and even a roulade, inspired by the enchanting forest, come to life. Meringue, with its notorious fickleness, coupled with the ticking clock and the scrutinizing gaze of the judges, sets the stage for a high-stakes drama. Under such intense conditions, it’s hardly surprising to witness the competitors grappling with their composure.
The saga continues into the next day, offering the culinary warriors another shot at glory and a chance to dodge Angela’s dreaded eliminator challenge. This time, they face Chris’s formidable rustle-up challenge—a test of skill, creativity, and speed, where they have a mere sixty minutes to concoct a dish entirely from scratch. The current challenge elevates a simple vegetable to the limelight, demanding it be transformed into a culinary masterpiece. With the crutch of recipe books and notes kicked away and only a sparse selection of additional ingredients at their disposal, the cooks are thrust into a trial where maintaining composure under duress is crucial.
Having been front-row spectators to the previous week’s eliminator round, where the competition bid farewell to its first casualty, the tension among the chefs has palpably intensified. Angela turns the heat up a notch with a round that’s even more brisk and a recipe that leaves no room for error, demanding impeccable timing and flawless seasoning. As the round concludes, the judges face the arduous task of reaching a consensus on which dish falls short and which contestant’s journey ends here.
In this second episode of “Best Home Cook,” the stakes have never been higher. Each challenge is designed not only to test the culinary skills of the contestants but also to push them to their limits, fostering an environment where only the most resilient and innovative can thrive. From the mercurial nature of meringues to the simplicity turned sophistication of vegetable dishes, the show encapsulates the essence of what it means to be a top home cook. The journey is fraught with tension, emotion, and the relentless pursuit of perfection, underscoring the relentless drive and passion that define the culinary world.
Best Home Cook episode 2
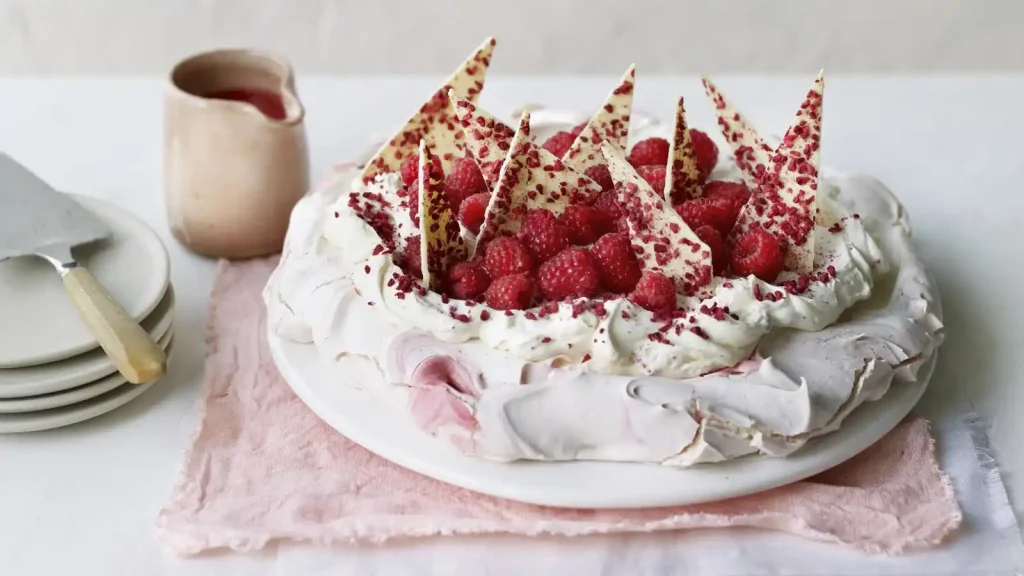
Raspberry and white chocolate pavlova

This delectable raspberry and white chocolate pavlova is the epitome of a spectacular dessert, perfectly suited for gracing the table at special occasions. Its exquisite combination of flavors and textures not only delights the palate but also presents a visually stunning centerpiece. What sets this dessert apart is its convenience for preparation; each component can be crafted well in advance, ensuring a stress-free assembly when the moment to serve arrives.
To embark on creating this culinary masterpiece, a few essential tools are required. You will need the aid of an electric mixer, which plays a pivotal role in achieving the pavlova’s signature light and airy meringue. Additionally, a large baking tray is indispensable for shaping and baking the meringue to perfection. Lastly, a cooking thermometer is crucial for monitoring the precise temperature, ensuring the meringue achieves its characteristic crisp exterior and marshmallow-like interior. With these tools at your disposal, crafting this elegant dessert becomes an achievable feat, promising to leave a lasting impression on your guests.
Ingredients:
For the meringue
- 6 egg whites
- 375g/13oz caster sugar
- 2 tsp cornflour
- 2 tsp white wine vinegar
- 2 tsp vanilla extract
- 1 small blob of red food colouring paste (optional)
- 300g/10½oz fresh raspberries, to decorate
For the chocolate shards
- 200g/7oz good-quality white chocolate, chopped
- 1 small handful (approximately 5g) freeze-dried raspberry pieces, plus extra to decorate
For the raspberry filling
- 600ml/20fl oz double cream
- 2 tsp vanilla extract
- 2 small handfuls (approximately 10g) freeze-dried raspberry pieces
For the coulis
- 350g/12oz frozen or fresh raspberries
- 2 tbsp icing sugar, sifted
Method:
- Preheat the oven to 150C/130C Fan/Gas 2. Draw a 28cm/11in circle on a sheet of baking paper (you can draw round a large dinner plate).
- For the meringue, whisk the egg whites using an electric mixer until stiff peaks form when the whisk is removed. Then, with the motor running, add a tablespoon of sugar at a time until all the sugar is incorporated and the meringue is glossy and holding stiff peaks. Blend the cornflour with the vinegar and whisk into the meringue, along with the vanilla extract. Dip the tip of a skewer or small knife in the red food colouring paste (if using) and mix well to make the meringue pale pink.
- Take the prepared sheet of baking paper and place it, pencil marks down, onto a large baking tray. Use a little meringue in each corner to stick the paper to the baking tray. Using a large spoon or spatula, pile the meringue onto the circle on the baking paper, spreading it to cover the edge of the circle and swirling and building up the sides so that they are higher than the centre. You need to leave a slight dip in the centre to allow for the cream filling.
- Place the meringue in the oven and immediately turn the oven down to 140C/120C Fan/Gas 1. Bake for about 1 hour, or until the outside is crisp but not browned. Turn off the oven and open the door fully, then leave the meringue in there to cool for at least 1 hour, but preferably until cooled completely.
- For the shards, set aside a third of the chocolate. Place the chocolate in a large heatproof bowl set over a saucepan of gently simmering water. Allow to melt until the chocolate reaches 45C on a cooking thermometer. Remove from the heat, add the reserved chocolate and stir until it is melted and reaches 26–27C. Return the chocolate to the bain marie and heat gently until the chocolate reaches 28–29C. Using a palette knife, spread the white chocolate over a large sheet of baking paper. Top with the freeze-dried raspberry pieces and set aside to cool and set.
- For the filling, whip the cream until soft peaks form when the whisk is removed. Stir in the vanilla extract and fold in the freeze-dried raspberry pieces.
- For the coulis, place the raspberries, icing sugar and 2 tablespoons water in a saucepan. Warm over a gentle heat and stir frequently until the raspberries have collapsed. Remove from the heat and use a fork or hand blender to further break up the raspberries. Push through a fine sieve into a jug and loosen with a splash of water, if necessary to reach desired consistency. Place in the fridge to cool.
- Once the chocolate has set, break it into shards (these will be used to decorate the top of the pavlova).
- To assemble, spoon the whipped cream mixture into the centre of the pavlova. Scatter the fresh raspberries on top, followed by a sprinkle of freeze-dried raspberry pieces. Drizzle with the raspberry coulis and decorate with the shards of chocolate. Cut into slices and serve.
Tempura squid with garlic aioli
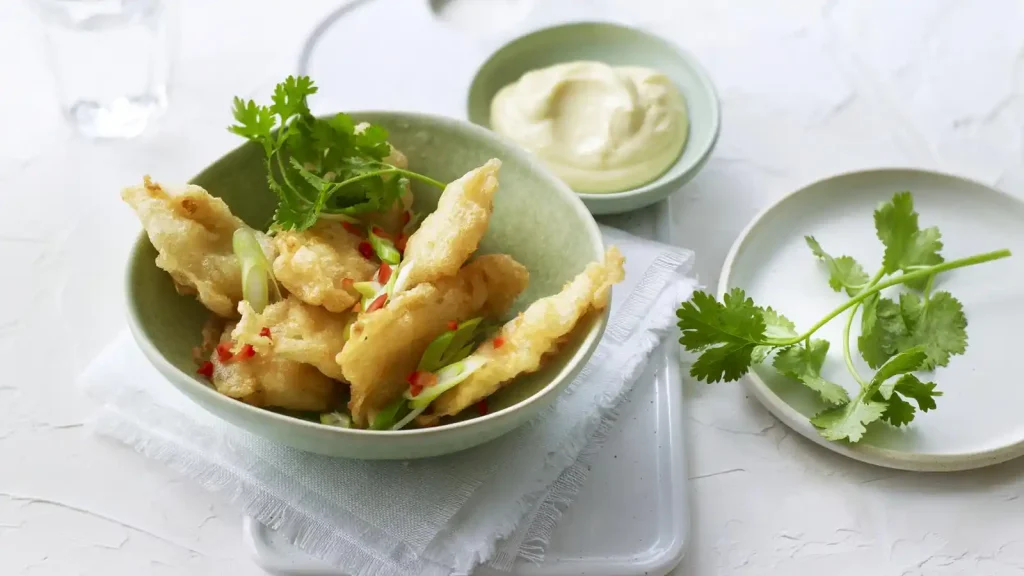
Angela guides you through the delightful process of preparing and cooking squid, presenting it in a light and crisp batter that pairs perfectly with a creamy garlic mayo for an enhanced dipping experience. For those looking to streamline their cooking process without compromising on taste, Angela suggests opting for ready-prepared squid. This savvy tip ensures that the entire recipe comes together in just a few minutes, allowing you to enjoy this exquisite dish with minimal effort and time.
Ingredients:
For the batter
- 50g/1¾oz rice flour
- 50g/1¾oz ‘00’ flour, plus extra for dusting
- 200ml/7fl oz ice cold sparkling water
- salt and freshly ground black pepper
For the squid
- 2 small squid
- vegetable oil, for deep-frying
- salt and freshly ground black pepper
For the aioli
- 1 free-range egg yolk
- 1 tsp Dijon mustard
- 150ml/¼ pint olive oil
- 2 garlic cloves, finely chopped
- lemon juice, to taste
- salt and freshly ground black pepper
To garnish
- 1 red chilli, finely sliced
- ½ spring onion, finely sliced
- small handful chopped fresh coriander
Method:
- First make the batter. Put both flours into a large bowl and slowly add the sparkling water, mixing to combine and adding enough water to make a batter the consistency of double cream (you may not need all the water). Season with salt and pepper and leave to rest while you prepare the squid.
- For the squid, remove the hard, transparent quill from inside the squids’ bodies and discard. Remove the ‘ears’ from either side of the body then, using your fingers, peel away the thin membrane and discard. Remove and discard any remaining innards then wash under cold running water.
- Cut the squid open by carefully cutting through one side and opening the squid up like a book. Ensure the body is cleaned of any innards. Score the inside surface of the body in a criss-cross pattern, ensuring your knife does not go all the way through the flesh. Cut the squid into pieces.
- For the aioli, combine the egg yolk, mustard and a pinch of salt in a bowl. Very slowly add the oil, while whisking continuously. At first this must be done drop by drop but once you’ve added a quarter of the oil you can start to add the rest in larger amounts. Keep whisking until all the oil is incorporated and the mixture has emulsified. Stir in the garlic and lemon juice and season with salt and pepper. Add a splash of water to loosen the aioli, if desired. Set aside.
- Preheat a deep-fat fryer to 180C or alternatively place enough oil in large, deep saucepan to half fill. Place over a medium heat and heat the oil to 180C or until a cube of bread becomes golden and crispy after 1 minute in the oil. (CAUTION: hot oil can be dangerous. Do not leave unattended.)
- Place some flour on a plate and season with salt and pepper. Dust the squid in the seasoned flour and dip each piece of squid individually into the batter and then straight into the hot oil. Fry in batches for 1–2 minutes or until crisp and light golden brown. Use a slotted spoon to remove from the hot oil. Drain on kitchen paper and keep warm. Season again, to taste. Serve the squid alongside the aioli and garnish with chilli, spring onion and coriander.